We recently got the LEGO CITY: People Pack Outdoor Adventures set 60202 to add to our minifig collection. Mainly we got it for the baby minifigure since we have a real baby coming soon and I’ll need to add the baby to the youtube family banner picture.
After we opened it and built all the minifigures we talked about some ideas for a video using the new minifigs. I liked the idea of the minifigures walking out of the box themselves. It would be like an unboxing video where the minifigures unbox themselves. I hadn’t seen any videos like this before so it would be a good challenge to see it if worked.
I had one full day free to work on it and I wanted to get all the filming done in that time so I started by setting everything up like you can see in this picture.
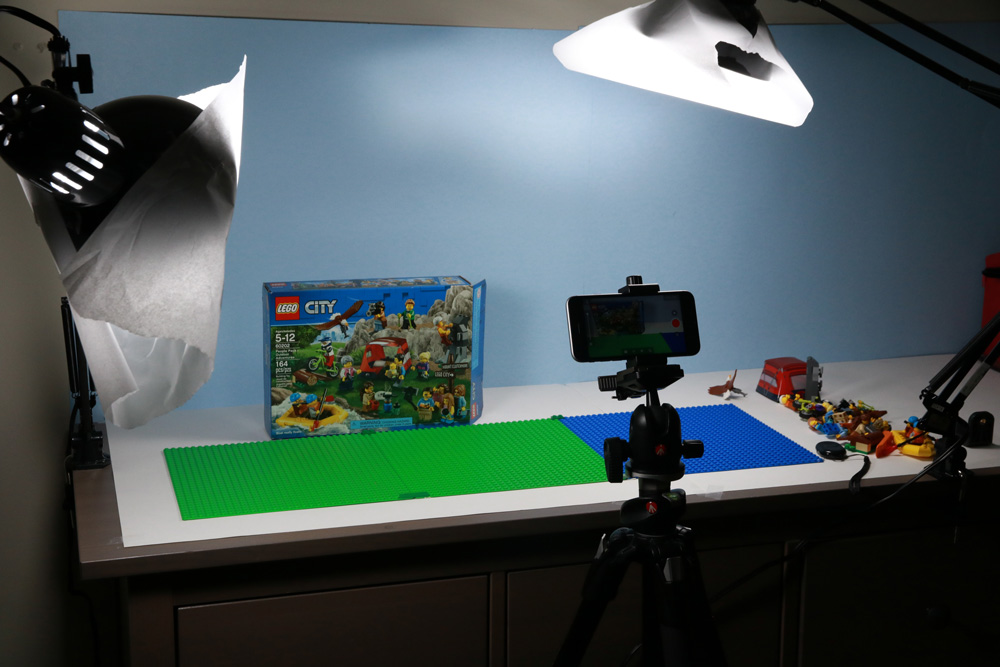
I setup the box and played around with positioning to ensure the full box could be seen. There wasn’t really a plan for how all the minifigures would come out but I did have the idea of the rafters coming out on a flood of water. So I needed somewhere for them to go. I ended up with a “pool” of water on the right hand side and green grass coverting most of the scene. This would allow me to have most of the figures on land and still leave room for the rafters to come out.
I hadn’t decided the order for the minifigs to come out of the box so I started by grouping the minifigs. I mainly just went with the grouping they had on the box art. The family with the tent, the selfie stick family, the hikers, the rafters and then the biker and climber on their own. I put all the minifigs off to the side out of view of the camera.
First steps in filming was to open the box. That was easy enough. I did a few different versions until I was happy with the speed of opening. Sticky tack was used to hold the “doors” as they opened. The first challenge was figuring out how to get the minifigs to walk to the green base plate. I thought it would be too messy to have them walk on the smooth surface first so I added the green plates coming out of the box first. This gave a better base for the minifigs to start walking on.
When discussing the idea with my family we did some play acting for voices of the minifigs. I knew my son was going to voice the little boy and my daughter was going to voice the little girl. I thought it would be nice to have one of them poke their head out at the start to take a look first and say hello and then start walking.
The basic idea was to have each minigfig come out of the box, walk a little bit to the right, turn to face the camera, then walk straight on to the main green plate. From there each one would turn to the left and walk over as far as they could go to leave space for all the rest of the minifigs.
Starting with the little boy, followed by the little girl, I followed this plan. I wanted to incorporate all the accessories in some way as well. I wasn’t sure the best way to do this since some of them were big, such as the tent. With the boy and girl it was easy enough since their accessories are small and they could just take them out of their “pockets”.
The tent was much trickier since it is really big compared to the minifigs. In the end though I decided that it is LEGO after all and it’s perfectly fine for them to be able to fit a tent into their pocket. I did include a bit of a scene of the tent being put up rather than the coming out full made. I think this helped make it look better.
Since this was a new set and some of the minifigs were really stiff. This made the walking movements painful to do since some of the arms and legs did not move easily. Especially the father with the baby carrier.
I had taken a lot of time to get to the point that the first family was out and the tent was setup. I needed to speed filming up a bit so you might be able to notice that the minifigs walks got a bit faster as the video progresses. After the tent was setup out came the hiker and photographer. Nothing too complicated for these two. They just walked across.
Next was the climber. This presented a bit more of a challenge. How was I going to get the rocks into the scene. He couldn’t really pull it from his pocket. Instead I went with it magically appearing. Again, it is LEGO after all. To help make it fit into the scene a bit more I had the climber come out and look around first. Then when it appears he gets surprised before running off to climb it.
The animation for him running over and climbing is a bit choppy. I was trying to make it look like he was running fast but I think I went a bit too fast with it.
Next came the mountain biker. This was one of the hardest of all. I wanted to have the biker use the jump accessory to jump over the tent. Again I went with the accessory magically appearing. The main challenge was making the bike fly off the ramp and over the tent. I used two pieces of wire, one attached to each wheel and stuck to the base plate with sticky tack. The wire wasn’t really strong enough to hold up the bike though so I had to be really quick in taking the photos while it was in the air. I ended up taking only 3 or 4 shots in air so the jump appears a bit too quick in the final video.
By this stage of the day I was really starting to run out of time so I had the whole “selfie” family walk out at the same time. Luckily enough with each new set of minifigs coming out of the box there was less walking to do since there wasn’t much space left. However moving the group was challenging enough since all the minifigs had to be moved every frame and they were really close together. I definitely knocked some of the over a few times. The selfie shot was fun. I took it with another camera so I didn’t need to disturb my main camera.
Next came the white water rafters. There were two options here. Have them carry the boat out or have to come out on water. I went with the water approach since it would have been too fiddly to have them holding the boad and get in. It would be easier for them to be in the boat and the whole boat move. Plus I thought having water gush out with the boat on it would look better. I played around with various blue and clear studs to make it look like white water.
Finally came the eagle. I probably spend more time trying to get the eagle flying than any other part. I put the eagle on a stack of 1x1 studs and moved it along a path out of the box. When it got to near the boat I played it back. I wasn’t happy with the movements, I had been moving about 2 studs every frame. I needed to redo this and move the eagle only 1 stud per frame. This gave a much better look to the final result. The trickiest part was trying to have the eagle fly over the boat. You’ll notice the eagle takes a bit of a weird turn when it is over the boat. That’s because I had to go around the boat with the stack of studs that was holding the eagle up. I didn’t have any more time to send on it so it was going to be good enough for this video.
The very last scenes with the eagle flying by the camera were taken with me just holding the eagle. It turned out ok since there were only a few frames. The trickiest part was getting the focus right.
By this point the video was sitting nearly around the 2 minute mark. I was happy enough with it but when thinking about the fact that it is an unboxing video the viewer didn’t really get to see the minifigs up close. I took individual shots of each of the minifigs and their accessories to showcase them a bit better. This ended up bringing the video closer to 3 minutes.
I edited the video in Stop motion studio. This is fine for the most part. However there were over 100 shots with the eagle that need to have the stack of studs edited out. This was seriously painful to do on my phone since I was just using my finger to erase parts of the image. In hindsight I should have copied all the images to my computer and done the editing there instead. It would likely been a lot faster. The shadows for the eagle were tricky too so I think they look a bit dodgy in the final video.
Thankfully though once that was done all that was left to do was the sound. This part was a lot of fun. The whole family was involved and we came up with voices for each of the characters and decided what they could say. I didn’t have any of the dialog decided on before filming so instead we just fit in what we thought was suitable. The kids really liked doing the voices and seeing the end result. Lastly I got some music from the Youtube sound library and some other sound effects from Sound bible and from Free Sound. Completely by chance the music lined up perfectly with the video. I chose two pieces of music, one for the minifigs coming out of the box and the other for the minifig showcase at the end.
Overall I really enjoyed making this video. Having my family help with the voices and the ideas for the video is great. It was definitely the most challenging one I have done so far and the longest by far.
Details:
- Shot with Stop Motion Studio
- iPhone camera
- 1150 Frames
- 15 fps
Things to improve on:
- Don’t try and fit all the filming into one day. It leads to rushing parts of it. Stop motion takes a lot of time!
- Try moving the limbs on the minifigs to make sure they are loose before filming, otherwise it can be a lot of work to get them walking properly.
- Use strong wire to hold up any “flying” objects.
- If using a stack of studs to make an object fly make sure the path on the base plate is clear or you will need to make some turns that might not look great at the end.
- Use more frames for running animations.