My son built the water cooler you see in the video. He saw it in one of the LEGO ideas books. Using the water cooler as the main prop we started talking about how we could use it in a video.
We came up with the idea of a minifig walking up to it and filling their cup with water. When we played it out we talked about what else could happen. One of us had the idea of water shooting out and hitting the minifig. This seemed like a fun idea.
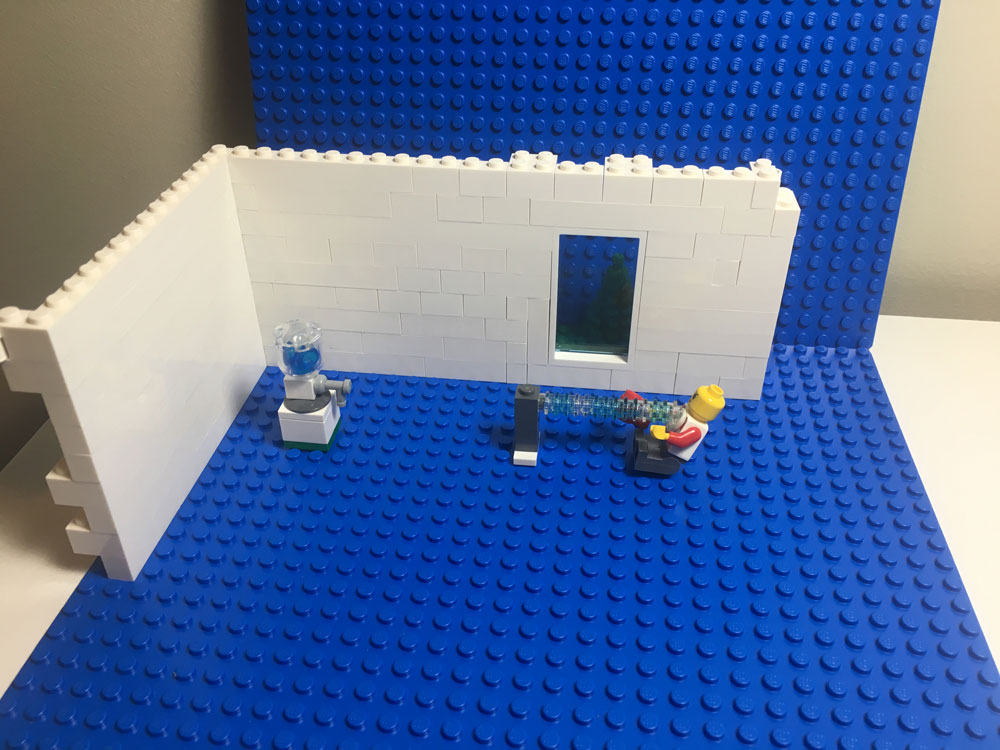
We set to work building a set for it. I pulled out all the white bricks I could find and we built a corner of a room.
Here is a look at the set.

The main idea was to have the minifig walk up to the water cooler and try and get water. No water would come out which made the minifig angry so she hits the water cooler tap. This causes water to shoot out and send her flying across the room.
There were a few new things in this video I hadn’t done before.
- Building a custom set for the video, albeit just a basic wall and window.
- Swapping heads of the minifig to show different emotions
- Use sounds not included by default in Stop Motion Studio
- Having an object fly through the air
The set was very basic. Just a corner wall and window so building it was no trouble. I found that the angle I shot the video at wasn’t great since you couldn’t really see the minifigs face all the time. Part of this was because of the corner. I didn’t really need to build a corner at all. Had it not been there it would have been easier to postion to camera more to the left and get a better view of the minifigs face.
Swapping heads to show expressions was new for this video too. It’s a bit hard to see in the video but the minifig had 3 different heads at different parts to show her getting more angry at the water cooler. Again the angle of the camera made this harder to see so I needed to turn the characters head every so often. The changes might be a bit too subtle for anyone to pick up.
I spent some time after shooting all the images searching for sounds that would fit the video. I used Sound Bible to find free sounds effects to use. I used ice cubes in a cup sound effect for the cup under the tap. And I used gavel banging sound effect for both the minifig hitting the tap with her hand and a louder version for the big hit of the cup on the tap. These worked pretty well. Using Stop Motion studio you can trim the sounds to match them with what is in your video.
The last challenge was to have the water fly through the air and move the character back. This required using the erase feature in Stop Motion Studio. I first took a shot without the character and the water. Using this as the base I overlaid each frame and erased the support that held up the water. You can see the support in the image above. This took a lot of time and is a bit tedius to do on the phone. It’s not very precise since a finger is never going to be as good as a mouse on a computer. But it worked well enough in this case with a little patience. One other tricky part was trying to make sure the shadows of the support on the floor got erased too. These are easily missed when erasing the main object. The character was stuck to the end of the water with some sticky tack.
I actually ended up taking a shot for each piece that was added to the trail of water as it shot out of the water cooler. And I took a shot as I moved the water 1 stud at a time to the right. This turned out to be way too many shots because the water moved way too slowly at 15fps. So in the end I threw away about half the water moving shots to ensure it looked fast enough but still gave enough time for the viewer to see what was happening.
In the last part of the scene I decided to have the water cooler fix itself and walk away. This was to try and give some life to the water cooler itself and leave the viewer feeling sorry for the water cooler since it was kind of alive.
This was the most planned video I have done so far. I didn’t see a lot of flickering of light. I tried to be conscious of the light and make sure it didn’t change in the scene. Overall I was really happy with how this one turned out. And my kids thought it was funny so that’s good enough for me.
Details:
- Shot with Stop Motion Studio
- iPhone camera
- 337 Frames
- 15 fps
Things to improve on:
- Try out the camera angle before building too much of the set to ensure it is right. The left wall was not needed or at least didn’t need to be as big since you couldn’t see it in the video
- It would be better to be able to see the minifigs face all the time rather than just when she turned her head
- Plan out how many shots will be needed based on the fps. I have just been deciding on the fps after shooting all the pictures. Basically pick an fps and play the video to see how it looks, changing it if it looks too fast or slow. This leads to issues where some parts can look too fast and some are too slow within the same video.